A stabilizer is an essential for machine embroidery. It is used to support the fabric during the stitching process to prevent puckering or stretching.
Using a stabilizer that is insufficient for the fabric or the stitch count of the design can make even the best digitized design look bad.
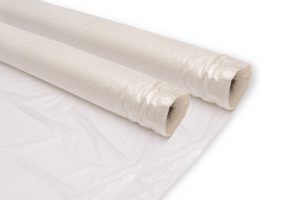
Water soluble stabilizers are designed to dissolve when wet and come in several forms: plastic-like film and soluble paper, both of which can be hooped with the fabric, and liquids that stiffen when brushed or sprayed on the fabric and allowed to dry.
Water soluble embroidery stabilizer, being one of the niftiest inventions for machine embroidery, will dissolve completely when immersed in water leaving no backing and traces at all once removed.
They are perfect when you need an embroidery stabilizer to disappear leaving nothing behind.
Also called “wash-away stabilizer”, this product can function as a backing or topper for your embroidery projects.
What Is A Water-Soluble Stabilizer Used For?
Made from water-soluble fibers, water-soluble stabilizer is designed to dissolve in water after it’s served its purpose as either a topping or stabilizer backing for your embroidery project.
You can either float the water-soluble stabilizer with the project, or hoop the water-soluble stabilizer and float the project on top.
Water soluble stabilizer are best used with sheer fabrics like net, organza, open-weave or nappy textured fabrics. The water-soluble stabilizer provides a foundation on which you stitch out the patch. After you do a nice satin stitch around the outside edge of the patch, you simply wash away the stabilizer and you have a nice, clean finish.
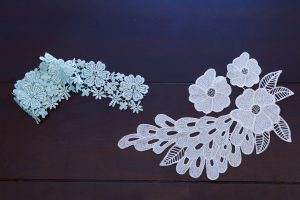
Water soluble stabilizer is also essential for most free-standing lace projects. This is because you need a foundation on which to stitch out the free-standing lace. After you finish and rinse project, the stabilizer will disappear and you are left with lace.
Water soluble stabilizer is also used frequently for in-the hoop projects. For example, if the project has a finished satin stitch edge, you would want to use a water-soluble stabilizer so that no stabilizer shows around the outside edge. In some cases, you can hoop just water-soluble stabilizer and then embroider on top of it. This is the case when embroidering free-standing lace or making patches.
Water soluble stabilizers should be used when all traces of the stabilizer need to be removed from the front or back of the project, such as when using a sheer fabric or embroidering a project that will be seen from the back side as well as the front. Since this type of stabilizer does not support as many stitches as tear away or cut away stabilizers, careful consideration should be given to the design choice. Do not use this stabilizer if your fabric cannot be washed.Types Of Wash Away Stabilizers
Heavy Stabilizer
Heavy water-soluble stabilizers can be used for stand-alone laces and as well as open designs on organza.
Light Stabilizers
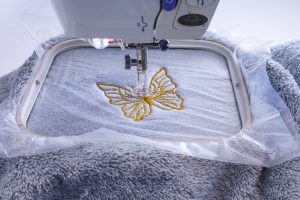
Light stabilizers are used for fabrics that have pile or texture such as terrycloth. These stabilizers are used on top of fabric and ensures that nothing is visible after they are removed.
How To Use A Water-Soluble Stabilizer
In order to choose a right stabilizer for machine embroidery, you need to take into account the following factors:
The structure of the fabric, type and properties of the fibers
The density of the embroidery and whether the embroidery will come into contact with the skin.
Before using the water-soluble stabilizer, you need to set the machine with the appropriate settings to get the perfect stitching finish. With these settings, set your machine accordingly and place the water-soluble fabric in the hoop, ensuring the material lays flat over the embroidery plate. It would be best if you start stitching over that stabilizer, and you are ready to go.
Step 1 – Keep The Fabric Properly Over The Plate
First, you need to ensure that the fabric you are using is appropriately tied to your embroidery plate. You can even double it up, creating a sturdier and firmer fabric that would not tear at all.
Step 2 – Trace The Selected Image Over The Fabric
Secondly, you need to trace the selected image over your fabric. You can use the standard pencil or the felt pens for this work. The water-soluble stabilizers fit perfectly to the standard printed image, and you can easily print the embroidery design over it directly from your printer. You can also trace the design or freehand the design.
Useful tip: If you are using a pen, try to use it of a similar color as per your thread, as if it leaves any traces and showcases/bleeds while your washing stage it won’t look bad.
Step 3 – Start Needling The Thread Zigzag Between The Traces To Create A Web
The next step is to needle the thread by following the outline, creating a web-like structure to the fabric. This is somehow an easy step and helps make the stitches firmer or sturdier, providing them with the base to grip.
You need not worry about it being intact, since all you need to do is stick the stabilizer to the fabric and begin with your stitching. It is easier to work over delicate fabrics with extra stability, allowing you to design with dense embroidery patterns. Just ensure that the stitches adjoin the outlines or traced edges appropriately.
Step 4 – Build The Layers Of Stitching To Design
Now, after the above step, your embroidery base will be completed.
You will now need to start building the stitching layer forming a design. Vary the direction regularly, (if the stitches follow a single path, they may fall apart after you wash off the fabric). After this, you will not be able to stitch the fabric again or be over frivolous with the stitching pattern you have followed.
Step 5 – Decorate The Base With Other Threads
Once finished with the minimal base stitching, start decorating the embroidery with other color threads. You can go for the metallic thread and continue your zigzag stitching pattern to provide it with the shard effect. You can also keep the color of the second thread the same as the base.
Step 6 – Finish The Sewing By Stitching Around The Edge
While completing the work, you can choose any of the threads you desire and stitch the zigzag design with your free hand across the border. It will help in securing the borders properly as these are the high areas that may unravel. You can also repeat this method with the similar color thread you used for the base tracing if you don’t desire to contrast the border.
Step 7 – Remove The Hoop
Once you are done with the stitching and shaping, remove the hoop. After doing that, trim around the design roughly before washing the fabric gently by hand. It doesn’t require any soap or detergent to clean; instead, just cold or hot water, depending on your stabilizer. Besides, the fabric wash instructions can also help to get the perfect result.
Once it is rinsed and dried, you will attain the gorgeous design. You can also soak the fabric in water for some minutes, and the stabilizer will disappear completely. You can even dab it with a wet cloth to dissolve and disappear the stabilizer without much effort.
Step 8 – Dry The Embroidery
After washing the fabric, lay down the embroidered fabric over any flat surface to dry out. Alternatively, to form the curved shape, place the final result on the mug or the bowl. Once it has dried, it will hold the shape of the material it was kept at. The shape is up to you and you can form any of the shapes you like for your embroidered work.
Removing The Water-Soluble Stabilizer
There are different ways of removing the water-soluble stabilizer once your design is completed. You can remove as much stabilizer as possible by tearing or cutting away the excess, or by rinsing the project under warm running water until all traces of the stabilizer are removed.
If you’ve used water soluble stabilizer as your embroidery backing, the best removal method is to trim the stabilizer close to the back of the design.
Then, run the embroidered item through the washer, soak it in water, or even run it under the tap until the stabilizer is dissolved.You do need to wash all the paper-type of water-soluble stabilizer the first time around. Otherwise, the stiffness, once dried, might be permanent.
If you’ve used a water-soluble topper, clip any jump stitches first and then tear off as much stabilizer as you can with your fingers.
Some other ways to remove the stabilizer:
Tap Water
Use a Seam-Fix Remover
Damp Paper Towel + Iron
Advantages Of Water-Soluble Stabilizer
Water soluble stabilizers are perfect for projects that can’t have any backing once they are finished. The stabilizer will disappear completely. These backings are perfect for projects with fabrics that are not easy to mark. You can draw on the stabilizer as much as you want: the drawings will disappear once you apply water.
If you are creating stand-alone lace with your embroidery machine, these stabilizers are the perfect choice for you.Disadvantages Of Water-Soluble Stabilizer
Once you remove the stabilizer, nothing is holding your stitches together. Unlike cut-away stabilizers, water soluble stabilizers won’t contribute to durability. Also, the stabilizer itself is not as strong as the other ones.
You can’t use these stabilizers in a fabric that you cannot wash.
This backing does not support as many designs as cut-away, or tear-away stabilizers do. You will have to be very mindful of your design choice.Conclusion
Water soluble stabilizers are used rarely as compared to the tear away and the cutaway stabilizers. They are best known for their transparency, water solubility, and flexibility. You will love the final work done using the water-soluble stabilizer. So, they are one of the best stabilizers for your project that requires no traces of stabilizers to be left on the fabric after embroidery. They are also considered the appropriate invisible stabilizers and are used with sheer materials or more delicate pieces requiring consistent stand alone or wash-and-wear lace designs.
So, use the water-soluble stabilizer and get your embroidery done with a perfect finish!