Every embroiderer works hard to achieve excellent results. From choosing right needle to appropriate thread tension, there are many factors that can affect the end results. Among these factors there is one tricky factor called push and pull compensation. In order to understand this phenomenon, it is also essential for embroiderer to understand the type of fabric that is being used.

Three Main Types Of Fabrics
There are three main types of fabrics that we are going to discuss in this article that includes:
Woven Fabrics
Woven Fabrics are made of two types of yarns; one is called warp or end and other is called weft or fill yarn. As the name suggests, the end yarns run end to end in vertical direction while the fill yarns run horizontal going up and down the end yarns in specific sequence to form a weave. Woven fabrics have stable structure and most of the fabric you see around you every day are mostly woven. Examples of woven fabric are Denim shirts, pants, coats, jackets, decorative spreads, napkins, towels etc.
Knit Fabrics
Knitting is another type of fabric that you see around; this fabric is made by interloping of single yarn. The difference between woven and knitted fabric is stretch as knitted fabrics are stretcher than the woven fabrics. Examples of knitted fabrics are t-shirts, golf or polo shirts, sweaters, pullovers, socks, etc.
Terry
Do you know that terry cloth is considered a very tricky fabric because it can come under woven as well as knit fabric category? The category it will be considered under depends on the weight of terry. The two factors on which the pull compensation depends on are the weight of the fabric and the type of monograph design on the terry fabric.
Push And Pull Compensation
The penetration point of your stitch occurs when the needles go down and penetrate into the fabric. Thus, when the top thread in the needle penetrates into the fabric, it connects with the bobbin thread and the combination of two threads creates pulling effect. The pulling effect magnifies if you have a stretchy fabric or a long stitch.
In short, the longer the stitch the more it will pull in. This is also true for soft and stretchy fabric.
When this happens, you have to make your stitch even longer in order to compensate this factor. This is known as Pull Compensation
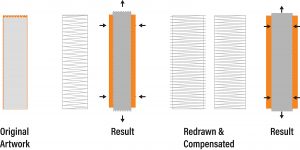
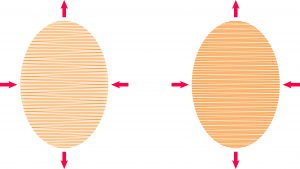
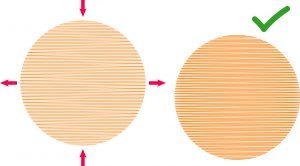
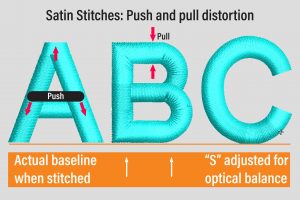
It is important to add some stitch length while creating a design for getting the same finished look at the end as perceived. This idea helps you in compensating the amount of stretchiness in the fabric. When you are working with shapes like square or circle, the results are not exact as required as it is pushing out and bunching from the corners.
Presently, we will suggest you to digitize the circle once more. This time you need to scale back the open finishes on the top and base and overstate the focuses on one or the other side of the bearing of the line. On screen it will resemble a sideways egg; when you run this document on your weaving machine, the outcome will be an ideal weaved circle.
For a light or medium weight terry, utilize 2 to 4 lines of Perpendicular underlay, Crisscross underlay or Contour underlay at .40 millimeters as the inset distance. Further make a force comp of .40 millimeters.
This can change contingent upon programming bundles. You need to ensure that you have sufficient underlay to pound down and hold the terry circles. For the significant burden terry makes utilization of 4 lines of Perpendicular underlay, Zig Zag underlay at a 45-degree point and the Contour underlay.
I normally increment the thickness of my Zig Zag underlay and possibly the thickness of the top sewing. Everything depends on the texture, make a draw comp of .60 millimeters since it tends to pull in the strands more than the lighter weight terry.
Most fabrics requires push compensation factor for compensating the push and pull effects during embroidery of a design.
All types of stitches cause push and pull effects, but it is most prominent with Complex fill stitches or Satin path.
we want to shed light on another area of push and pull that happens when you are embroidering on large area. You will experience more push and pull while working with large area. The longer the stitch length, the more the stitches will be pulling from the edges. Keep in mind that the knitted and softer fabrics will be affected more by the pull push effect.
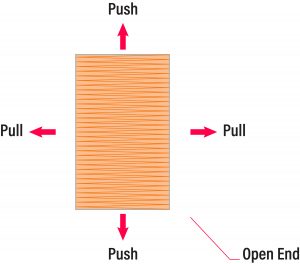
Push or expansion area is the open end of the segment or column. When you have review your embroidery, you will observe it is on the opposite side of the penetration points. You must bring in those areas or cut them short which is known as Push Compensation.Pull Compensation Determining Factors
Following are the factors on which pull compensation depends upon:
How Stretchy The Fabric Is?
What Type Of Material And How Many Underlay You Are Using?
How Wide The Column Of Your Segment Is?
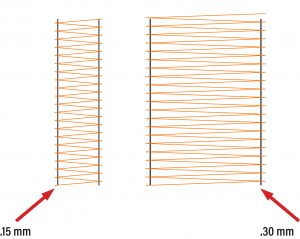
Let’s suppose if your column or satin stitch is 2 millimeters wide then you will need to add approximately 0.15 millimeters to your embroidery width. But if your column or satin stitch is 5 or 6 millimeters wide then you will add up to 0.3 millimeters width to your stitch width depending on the fabric’s stretch. As you can see in the below diagram, the more the stretch length the more pull compensation is required in order to achieve desired results.
Consider that some fabrics have more stretch and texture such as pique. In such circumstances you need to add as much as 0.40 millimeters for your pull compensation factor in order to get desired output result of the embroidery. Fabric type plays a big role in pull and push compensation as knit fabrics stretch and shrink more as compared to woven fabrics during embroidery. Therefore, in dealing with the knit fabric, the extra width helps in managing the shrinkage.
Importance Of Saving Design In Native Software File
Each design requires different pull and push compensation setting in the software on the basis of the nature of the fabric used. Therefore, it is better for the embroiderer to keep the design saved in the native software file and make changes in the software accordingly.
Pull And Push Compensation Adjustment In Embroidery Machine
Different software’s and machines are being used in the industry therefore adjustments of the pull and push compensation are made accordingly. The modern machines have different stitching results than the older ones which is complicated to deal with in digital era. Keep in mind that the adjustments are required even if you are making same design but on different machines. There are two ways of doing adjustment for compensation either with the under lay or by the pull compensation.
Conclusion
Keep in mind that you don’t have control over stable compensation. With practice and precision, you will turn into a learned embroiderer. Hopefully you have explored different angles of pull and push compensation in this fruitful article.
Copyright © 2017 Candle. All rights reserved.