Embroidering small letters is yet another tricky challenge that digitizers have to face to ensure quality results. Among the important factors size is the most crucial one. What is usually comprehendible on print may not be suitable for embroidery. Sometimes what a customer request is not doable. In such cases it is always advisable to understand and communicate all the challenges that hinders end results to the customers. In this blog we are going to discuss the dos and don’ts of small lettering embroidery in order to have exact results as seen on screen of print.
Digitalizing Small Letters
Various parameters need to be considered when digitizing small lettering embroidery as defined below. stitch length, pull compensation and underlay are three contributing factors.
Following are the important steps in detail needed to be done for accurate digitizing of small letters.
-
Space
Enough space must be added between each letter in order to ensure clear visibility. If enough space is not ensured between letters, it will be difficult to read. You can add enough space so that needle doesn’t drop and connects the letters to the closest point without being visible.
-
Text Width
Embroiderers mostly prefer letters not shorter than quarter-inch in order to produce high quality text. This can be achieved by using thinner threads and smaller needles.
-
Underlay
The removal of the underlay from the small lettering will help in eliminating the thread loops present in the design. As small letter embroidery is based on the small width and height letters, in such condition thread loops occur because the thread while making design doesn’t have enough space to adjust.
-
Pull Compensation Factor
Every fabric has natural tendency to pull and push on the forces applied to it during embroidery.
In order to overcome the tension on the stitches during the embroidery process, the digitizers add pull compensation setting to the software for getting desired results.
-
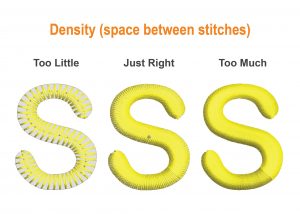
Density Adjustment
Density of small letters should be maintained in such a way that the letters stick out on the structured fabric and not sink in.
It is therefore necessary for an embroiderer to work out accurately and precisely on the density adjustment parameters for accurate results without pitfalls.
-
Avoid Tiny Fancy Letters
Fancy letters or serifs having variable column widths are difficult to embroider neatly. When you try to put a lot of stuff in a small space then you will surely compromise the output quality.
-
Speed Of The Embroidery Machine
The speed of the embroidery machine is set as per desires small letters height and width requirement. Usually, the speed of the machine is set up to 650 stitches per minute, while doing small letter embroidery on the caps.
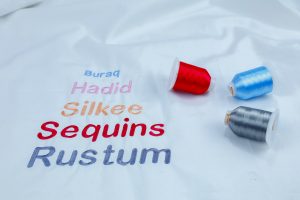
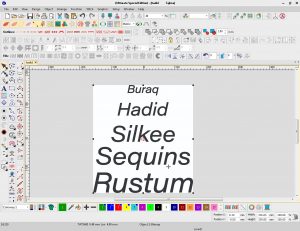
Screen Display of Small Lettering
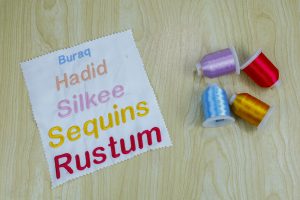
Fabric Display of Small Lettering
Once digitizing is done, you will be able to center and trace your design precisely through embroidery machine on the fabric. Although sometimes the design does not look appealing on the screen but once it is applied on the material, it looks much better as you can visualize in above small lettering text of “Diamond F Electric Services L.L.C.”
Best For Embroiding Small Letters?
Split Stitch is considered one of the best choices for small letters embroidery bearing lot of curves. It is simple and quick method for small lettering. The process starts by making a single stitch then bringing the thread back to middle of the same stitch. This phenomenon is usually carried out when you are splitting stitch into two.
Second stitch choice for small letters is known as Back Stitch. It is easy and quick method of embroidery using short stitch length; you can handle curvy letters very well. You can easily change the number of threads from one to six ply, according to the thickness requirement of your line.Needle And Thread Specification For Small Lettering
You can embroider small text easily by using small needle and a thinner thread. Usually embroiderers prefer 40-weight thread or 60-weight thread for small letters. The needle specifications that are used for small texting are 75/11 needle and sometimes even smaller needle like 70/10. The needle and thread specifications goes side by side. If you change one but not focus on the other, you will not able to produce desired output.
Cost Of Small Letters
The most straightforward approach for costing your work is to join tally. If you are a beginner, you can begin charging 50 pennies for each 1000 join and increment as high as $4 depending on the plan’s size. If you want to acquire $30/ 60 minutes, your absolute minimum cost should begin at $15 for a monogram, excluding the item. On the off chance that you charge $5 for a monogram, you will acquire very little compensation more than the lowest pay permitted by the law for all your time, aptitude and efforts.
How To Transform Embroidery Letters?
Computer programs are a realistic hotspot for various letters and styles of lettering. Use word, dominate or any program you need to print out the letters. The words processing programs that can be used for embroidering letters are:
Word
Excel
Google Docs
Photoshop
Illustrator
WPS Office
Word Perfect
The Best Font For Small Embroidery
For small letters Goudy Bold is preferred by embroiderers where as for large letters Brantford is preferable.
Conclusion
It is important to create balance between fabric, needles, thread, size and style of your lettering while doing small lettering. Ensure that the letter size is not too small as an output, since if the stitches are done on top of each other, holes will be created. Thread break also needs to be controlled during the formation of small lettering.