In the world of fabrics and threads, there’s nothing more innovative than doing embroidery! As an embroiderer, you can create magic on fabric through aesthetic embroidery designs. However, it’s also easy to mess things up, especially if you do embroidery in the wrong place on the fabric. The placement of an embroidery design plays an important role in embroidery. Your design should be straight, far from crooked, and placed directly in the center. But how can you ensure that a machine embroidery design ends up on the center of a t-shirt or sweatshirt? The answer is simple: you use the folding method to center machine embroidery designs or any shirt, especially t-shirts, tees, and sweatshirts.
However, have you never tried this method before? Here’s a beginners’-focused guide.Why Should You Learn The Folding Methods To Center Machine Embroidery Designs on T-shirts Or Sweatshirts?
But do you really need to learn the folding method? Can’t you just mark the center with a fabric pen and hope everything goes smoothly? No! No matter how much you try to measure and mark, your center point can be way off, and instead of having a t-shirt with an embroidered heart in the center, you would end up with an embroidered shirt with a design on the center-right. There are many excellent appliqué embroidery designs for kids and even adults that look amazing only if you stitch them on the exact center of their shirt, either horizontally or vertically. Even women’s dresses look great with some appliqué embroidery design on the center of their chest. Learning this folding technique would allow you to nail the method of centering machine embroidery designs on any clothes or fabric. Therefore, you can add any appliqué embroidery design, wear it yourself or gift it to a friend or family member. Trust us; this home creation will help you stand out at your next gathering, and you will get many questions about where you got a dress with an appliqué design in the perfect center.
Can You Face Complications While Centering A Machine Embroidery Design On A T-shirt or Sweatshirt?
Well, in the start, even embroidering the simplest appliqué design like a ball or an apple on a t-shirt or sweatshirt would take a lot of time. You might feel like giving up, but you must practice a bit before getting it right. But that’s not the only challenge you will face! Even when you get the hang of the folding technique, you will find that some embroidery designs are difficult to add to the center of a dress. This happens when you try to appliqué an embroidery design, where the true center of the embroidery design isn’t the aesthetic center. Placing it in the center won’t look aesthetic if you choose a design that’s slightly tilted to one side.
In addition, the same applies to designs with an outside line going away from one corner, like the thread of a balloon. But then, what should you do for designs that aren’t straight, are vertically long, or extended from one corner? For slightly tilted designs, place them in the center and let the tilt talk for itself. We all love a design that looks out-of-the-box, and a tilted embroidery design in the center has the power to do that!
For vertically long designs, you place the upper part in the center of the t-shirt and let it continue downwards. The same applies to balloon-like embroidery designs with one corner or line jutting out. Now that you know how to handle these different kinds of embroidery designs and are aware of any challenges you might face, it’s time to start the real deal, aka gathering the requirements and centering a machine embroidery design on a T-shirt or sweatshirt.What Things Do You Need To Center Machine Embroidery Designs On A T-shirt or Sweatshirt?
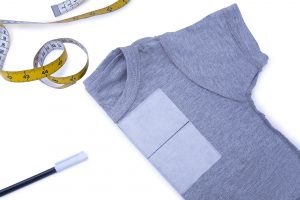
Like all other embroidery processes, this method requires you to gather some things and materials beforehand. It’s essential to make a list of these items and purchase or borrow them beforehand, so you won’t have to leave in the middle of centering machine embroidery designs on a t-shirt or sweatshirt. Pausing in between can be distracting and might ruin the final results. Here are the things you must need for this process.
A t-shirt or sweatshirt in the color of your choice. We recommend getting a light one with stretchable fabric, as you need a flexible one to fold it properly. In addition,
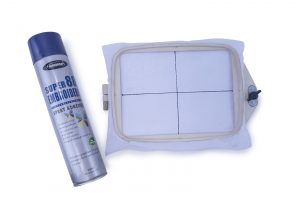
stretchable fabrics don’t have raw threads from underneath embroidery designs, which can be a headache during all embroidery methods, especially this one.An embroidery hoop to fix the t-shirt or sweatshirt during the embroidery.
An adhesive stabilizer layer that you can use to stick the shirt to it doesn’t move during the appliqué of embroidery designs.
Step-By-Step Guide To Center Machine Embroidery Designs On A T-shirt Or Sweatshirt
We know that we’re repeating the terms t-shirt and sweatshirt many times, but you can do the same for any clothes you have. However, the measurement can be a bit different, so you should practice on sweatshirts and t-shirts before understanding how to measure other dresses and fold them to get the appliqué design in the center. Now that you have gathered everything you need to center machine embroidery designs on different clothes, it’s time to get to work! Here’s an efficient step-by-step guide on how to do this and achieve great results, despite doing it for the first time.
Setting The T-shirt And Sweatshirt And Finding The Centers
The first step you need to center a machine embroidery design on your t-shirt or sweatshirt is to turn the t-shirt or sweatshirt inside out. Never try to appliqué on a t-shirt or sweatshirt using the folding method without turning it inside out beforehand. In the next step, line up the shoulder and side seams. After that, press firmly to create a fold line in the center of your t-shirt or sweatshirt. This was all about identifying the horizontal center of your t-shirt or sweatshirt.
Now it’s time to find the vertical center of your inside-out garment, t-shirt or sweatshirt. For this, you should memorize some concepts beforehand. On a women’s t-shirt or sweatshirt, you can find the vertical center 2-3 inches below the neck. This is where you should appliqué the embroidery design. However, the distance would be 2 inches from the neck for young children or teenagers and inches for baby’s t-shirts or onesies. In addition, the vertical center depends on your design’s length. For instance, if your design length is 4-inches, the vertical center would be 4.5 inches below the neck on the women’s t-shirt.
Once you have determined both the horizontal and vertical centers, use a temporary fabric pen to make a line, combining both the centers. This would prevent you from forgetting and messing up the final result later in doing appliqué on the t-shirt or sweatshirt.Add An Adhesive Stabilizer Layer To The Hoop
The next step is finding a hoop, an essential part of every machine embroidery process. It prevents your garment from moving during embroidery, making the results efficient and accurate. But do you know that you add a stabilizer layer to make the process even more accurate? Take an adhesive stabilizer, place it, and fix it in the hoop.
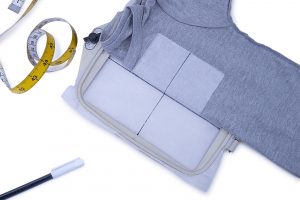
Use the pins in the hoop’s corner to score the stabilizer’s inside edges. Next, peel the upper layer of the stabilizer to reveal the sticky side. Use a pencil to draw lines among the vertical and horizontal center of the stabilizer, preparing it for the next step.Place The Shirt In The Hoop
The final step is to bring the folded t-shirt or sweatshirt to the hoop and line up the folded garment along the vertical line drawn in the stabilizer. Align the center point drawn on the shirt with the horizontal center line marked on the stabilizer in the hoop. Keep the t-shirt or sweatshirt folded during all steps. Press down the shirt to make it stick on the stabilizer and push the corners off to the side to appliqué on the center. Bring in your embroidery machine, add the design, and you’re good to go!
Can You Use The Folding Method To Place Machine Embroidery Designs On The Left?
Do you know that you can use the same folding method to place a machine embroidery design on the shirt’s left breast? This is also a typical spot to align embroidery designs, and polo t-shirts are a common example. However, the process is a bit different, and you must fold the shirt two times to get the vertical center. In addition, if the shirt has a breast pocket, it would be challenging to appliqué an embroidery design. Therefore, we recommend sticking to the method of centering machine embroidery designs on garments, especially at the start!
Conclusion
Now that you know the infamous folding method in embroidery, what’s stopping you from trying it? Flip one of your favorite t-shirts or sweatshirts, find a decent embroidery design and create your own garment; that’s as good as new! Everyone around you would love to find where you find these t-shirts, sweatshirts, and more, with designs exactly in the center. Moreover, they would be more shocked to find out that you did it yourself.
We hope this guide was helpful, and you will use it to create a lot of t-shirts and sweatshirts with centered embroidery designs. Good luck with your folding and embroidery journey!
Copyright © 2017 Candle. All rights reserved.