Embroidery On Terrycloth, Fleece, And Fur
Learning how to do embroidery on terrycloth, fleece, and fur is an exciting experience and can also prove to be profitable for embroiderers. For an embroiderer, the most beneficial items to profit their embroidery business is terrycloth, wool, and fur.
To do flawless embroidery on such material, the embroiderer needs to have enough knowledge. As a beginner, embroidery on such materials requires efficient tactics which will prove beneficial in the long-run, since the techniques and flawless work will attract more customers to your business.
To become a pro, however, in embroidery on such clothes, various things should be considered and followed in order to achieve a final perfect product. While you’re restricted exclusively by your innovativeness, here are a couple of approaches to help combat this fluffy problem.
Utilize a water-dissolvable fixing. This will make a smooth surface for embroidery on terry material, downy, and other finished textures
Utilize a thump-down fill
Use appliqué
Plan ahead and brainstorm ideas to create on the luxurious fabrics
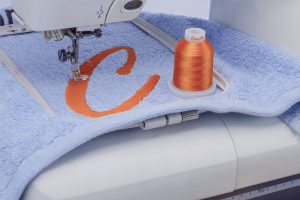
Embroidery On Terrycloth
The main concern of the embroiderer is to place the selected design on the towel and embroider it for this purpose. To achieve this, we have compiled steps for you to follow.
Design Selection
Make sure that the design you select is suitable for the selected towel. To achieve a terry design which will be prominent on the towel, we recommend using the size of 4″ by 4″ which is considered appropriate.
Floating Towel
Hooping is difficult while dealing with the towel due to the massive volume of the towel. While hooping the towel, the fibers of the towel get destroyed.
Floating is preferred in which the stabilizer gets hooped rather than the towel sticking, along with the hooped stabilizer. The stabilizer that we recommend is the adhesive-backed tear; the glossy side up of the hoop and the tightening results in the bounce. The regular stabilizer can also be used, by using the spray over the hopped stabilizer and using temporary adhesive.Design Placement
By tearing the stabilizer away, place the design at the center of the towel by making lines in both directions, horizontal and vertical.
The lines must be made before using the adhesives. The design should be placed from the bottom 8 inches above from the bath towel, and for the hand towel, the distance we would choose will be 5 inches. By using the picture as reference, the center point of your choice will be the mark.Stitching
For stitching over the towel, you need to choose a floatable and water-soluble piece so that the topper does not get entangled during stitching. As the towel’s fabric can sometimes be very thick, tulle can be used over the towel for embroidery.
Bobbin thread is recommended while doing this type of embroidery, and after finishing the embroidery, make sure to remove the tulle piece by tearing it.
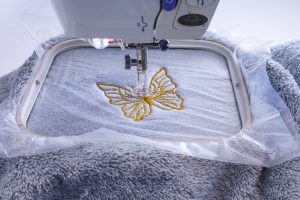
It will not harm the towel piece. Water-soluble topper then can be removed and simply nip the extra stitches using a nipper.Embroidery On Fleece
Fleece is used as an alternative to wool, and is mostly used to make the costumes for athletes since it provides them room to stretch. Following are the steps to do embroidery on fleece.
Stretch Test
Make sure you do the ‘Stretch test’ to ensure the stretch and flexibility before purchasing the fleece. The best fleece comes back to its original position after being stretched, and a good way to ensure the quality is to see if the product comes back to its original form after being stretched. If you buy a bad quality of fleece, the embroidery will not run properly on it.
Design Selection
Select the design according to the fleece. Fleece mainly supports lighter designs rather than dense designs.
Hooping
The purpose of using the soluble stabilizers is because it washes away. Hooping on fleece will result in causing hooping marks which can’t be removed. To prevent the sinking of the thread, water-soluble fleece stabilizer will be used at the top.
This is why, to avoid hooping spots, soluble stabilizers work as a great choice. Spray adhesives can be used over the water-soluble stabilizers to save the embroidery on fleece.Needle
While there are many options to choose from when it comes to the needle, most embroiderers don’t change their needle while dealing with fleece. We recommend using a ballpoint needle to do embroidery on the fleece. This is because stain stitch is more preferable on the fleece.
Stitching
Once you have picked out your fleece, towel and needle, then comes next choosing the area of stitching on your material, and stitch the designs of your choice by choosing the needle and stitch of your choice. After embroidery, remove the hopping marks if they appear by putting them into the washing machine.
Embroidery On Fur
Following are the steps that must be kept in mind while doing embroidery on fur.
Fabric Selection
Choose the fur before doing embroidery on it. If the fur is denser then the design will not be embodied in it. Therefore, trim the fur a bit to facilitate the embroidery of the selected design.
Design Selection
Design selection is the most crucial and important part of the entire process, and should be selected carefully. When working with fur, mostly thick and bold designs are preferred, whereas delicate designs and sheer designs are not recommended for fur.
Needle
For doing embroidery on the fur, the optimum needle size recommended is 75/11, having sharp edges, which will result in crisping the design.
Stabilizer
The cut away stabilizer is preferred when doing embroidery on fur. Since the fur contains fibers and requires support, and for this purpose, a cutaway stabilizer can be a great choice. The stabilizer needs to be covered using adhesives, and the top must be smooth. Water-soluble topping of greater size should be cut to be placed at the to
Stitching
You can try and experiment our embroidery design by using the selected needle using the machine. After embroidery, any extra topping pieces can be removed by using tweezers. If any of the topping is leftover on the fur, use any detergent to remove the clumps and then air dry. Now, your embroidery is completed on the fur.
Conclusion
It is helpful to have tactics to do embroidery on such varying materials. The stuff like terry cloth, fleece, and fur can be difficult to handle, and an embroiderer who doesn’t have enough knowledge of embroidery may not end up producing efficient results. People get attracted to the embroidered towels, furs, and fleece, as they are luxurious textures. For such a purpose, the embroidery must be on point so that the customer gets attracted, and for this reason, the embroiderer must follow the tips and tricks.

Copyright © 2017 Candle. All rights reserved.