What Is Stitch Density In Machine Embroidery?
The world of machine embroidery is expansive and with every experiment and mistake you learn a lot more about the embroidery design and different techniques you could adopt to improve your design.
You may come across a lot of jargons and difficult terms in learning the methods and watching tutorials which may leave you more confused than inspired to create designs and projects.In this article, we will learn about stitch density and how important it is for machine embroidery.
In our previous articles, we have written about different types of threads, different fabrics, machine embroidery and digitizing, and in this article your knowledge on all these different topics would come together and be useful as, in this article, we will talk about stitch density and how different types of thread used affect the coverage and design of your embroidery.
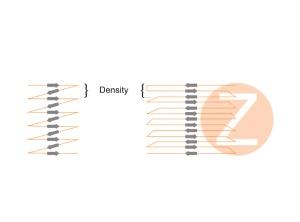
Stitch density is the distance between the stitch lines traveling in the same direction. It refers to how much area the machine is going to cover by using threads and how many stitches are used to complete the design.
How Is Density Measured?
Most embroiderers and embroidery software use the metric system for their measurements. In layman terms, the metric measurement is the distance between the threads and 1 stitch point is equal to 0.1 mm. The reason why the metric system is the preferred method is since there are small distances between each stitch, metric system makes it easier to calculate the density of the stitches.
Hooping the fabric and the threads on your machine and placing them in the correct position before you start stitching plays a pivotal role in measuring the density, as the accurate placement of the threads allow for a smoother stitch and prevents pulling and tearing of the threads.
If the threads are tangled together, causing the fabric to rip or even the threads to break, it may result in an inaccurate measurement and reading of the results, despite your method of calculation being correct.
What Do The Numbers Mean When Referring To Stitch Density?
It may seem confusing at first to understand the numbers and what they mean in terms of the stitch density. On the face of it, we may assume that higher the number, higher the stitch density. However, it is exactly the opposite.
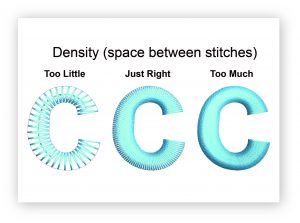
In simple words, in machine embroidery, the stitch density refers to how far apart the rows of stitches are. The higher the number, the lower the density. It is preferred by many embroiderers, (also depending on the fabric, the material and the type of threads used) that the stitching rows should be further apart from each other, resulting in a less dense and a better looking design since the stitching is more open rather than cramming too many stitches in one place.
When setting up your threads to start stitching, it is important to remember not to fill the stitches too dense and close to each other since that might lead to the threads being tangled with each other. This will cause distortion on the surface of the embroidery threads, causing them to break. Moreover, as you add more details, it may create patches of thread that get thicker and eventually not leaving room in the initial layers. These patches are often referred as bullet proof and are very stiff.What Is An Optimal Setting For Stitch Density?
Optimal design may vary from embroiderer to embroiderer, as well as on the vision for the end design.
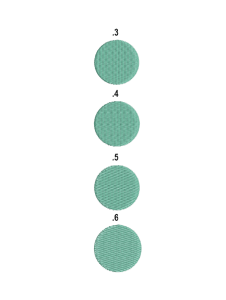
Moreover, different types of fabrics require different stitch densities. For some embroiderers, the optimal setting is of 0.4 for object fills, whilst some prefer between 0.3 to 0.6 .
These numbers represent the stitch density setting and different points are recommended for different fabrics; a stitch density setting for knit would differ from a stitch density setting for denim since these two are completely different fabrics.
Like your design is personal, so would be the optimal settings for your stitching, and this is achieved only through practicing and experimenting embroidery on a number of different products.
You can learn by practicing on your preferred embroidery software and machine. With everything else, always do a test design on various fabric swatches in order to ascertain what works best in which fabric and types of thread.How Density Affects Embroidery
There are two types of densities: High density and low density.
Low densities provide less coverage; however, the designs sew faster and do not pull on the fabric, resulting in a softer and flexible embroidery design. On the other hand, high densities lead to stiff designs, causing thread breaks, broken needles, fabric damage, design distortion.
When it comes to stitch density, needing full coverage is not necessarily always the desired option by embroiderers. Whilst achieving good coverage is important, this does not mean that to achieve this the stitch density should be extremely high. This can be achieved by finding your optimum stitch density setting for the fabric and the design you intend on embroidering, as well as the type of threads used to achieve this.
In other words, you have to find the balance between high and low that gives you good coverage but still enough space as well.
Fabric Properties And Appropriate Stitch Density In Machine Embroidery Designs
The concept of perfect density, while hard to achieve, is also relative. It depends on the fabric, color of the fabric used for the design and also on the embroiderer’s personal choice. Stable fabrics weaves such as denim twill can usually handle a more reduction in density than knits or fabrics with looser weaves.
Many studies have shown that fabrics used in higher density are prone to creating higher puncture load due to the stitching. Stitching on delicate fabrics with lower density results in less tearing and pulling on the fabric.How Can You Change Stitch Density?
To achieve a precise change in the density, it is important to have a good digitizing program. Many digitizing programs allow digitizers to control its settings, although the settings depend on the digitizing program you are using.
You can also shrink or stretch the design on your embroidery machine; stretching it will lower the density and shrinking it will increase the density. In each scenario, the stitch density is affected which ultimately affects your final design.Stitch Density Is Not Always The Problem
Sometimes people blame improper stitch density for poor quality stitches, but more commonly, the problem is how the fabric was stabilized and hooped on the machine. It could also be because of the threads and needles used have either worn out or breaking, causing riffs and distortion in the stitches.
When it comes to stitch density, just because the number is higher, it does not make the result better. Excessive stitch coverage leads to breakage and makes the tear which can be visible through the fabric.
One way to deal with poor quality stitches is to resize the design, provided that it is possible to reshape the design in the first place to accommodate such change, and does not result in shrinking or ripping the fabric. Focusing on the fabric design, you can also try reducing the density of the stitch and experiment to see which setting works best for your choice of fabric.Conclusion
The topic of stitch density may sometimes be overlooked and not be deemed important in machine embroidery and digitizing. Learning about stitch density comes in handy, with trial and errors, since it adds the perfect finishing touches to your design. Learning how to test your stitch density for embroidery may seem daunting and difficult at first, but it is such an important step to preserve your fabric and design.

Copyright © 2017 Candle. All rights reserved.